Greenbone Vulnerability Management 10 Docker on Kali rolling
May 7, 2019Prologue
This build is my way of trying to streamline the setup of GVM10(GSE) in a Master / Slave(s) config.
For this I made a few docker images that is hosted on dockerhub. I tried to write some docs about them here falkowich/gvm10-docker.
GVM10 is the opensource code of Greenbone Networks GmbH enterprice products.
You find more information of the enterprice products on https://www.greenbone.net/ and the source repository for GVM10(GSE) on github.com/greenbone.
This is by no means an official guide by Greenbone, this is my way to document my setup for the future :)
Start the guide already
This should work as a step-by-step guide to install both a standalone GVM10 installation, and a Master / Slave setup in a bigger enviroment.
So if you only want a standalone server, just follow along where is says Master on the headlines :D
MASTER
Install Docker and docker-compose on the Master
More information om how to install docker on Ubuntu » Get Docker CE for Ubuntu
sudo apt-get remove docker docker-engine docker.io containerd runc
sudo apt-get update

sudo apt-get install \
    apt-transport-https \
    ca-certificates \
    curl \
    gnupg-agent \
    software-properties-common

curl -fsSL https://download.docker.com/linux/ubuntu/gpg | sudo apt-key add -

sudo add-apt-repository \
   "deb [arch=amd64] https://download.docker.com/linux/ubuntu \
   $(lsb_release -cs) \
   stable"

sudo apt-get install docker-ce docker-ce-cli containerd.io
And for docker-compose » Install Docker Compose
sudo curl -L "https://github.com/docker/compose/releases/download/1.24.0/docker-compose-$(uname -s)-$(uname -m)" -o /usr/local/bin/docker-compose

sudo chmod +x /usr/local/bin/docker-compose
Add users and download docker - Master
I usually add a user that manage the docker containers, like in this case a user named gvm. This is of course totally optional :)
sudo adduser --disabled-login gvm-docker
sudo usermod -aG docker gvm-docker
Then change to the newly created user and download docker-compose.yml for the master.
sudo su - gvm-docker
curl -O https://raw.githubusercontent.com/falkowich/gvm10-docker/master/psql/docker-compose.yml
That file looks something like this:
version: '3'
services:

 gvm10:
    image: falkowich/gvm10:psql
    ports:
      - 443:443
      - 9391:9391
    restart: always
    volumes:
      - gvm:/usr/local/var/lib/gvm/
      - psql:/var/lib/postgresql/
volumes:
  gvm:
  psql:
TODO: Explain the yml somewhat
Start GVM10 with GSAD - Master
First download and start the container and tail the log for debugging purpose.
 docker-compose up -d
 docker-compose logs -f

After this the container starts up, initializes SCAP, CERT and loads NVT’s
When the screen shows Updating NVT cach it’s ok to continue…

Change password and login to your newly started GSA - Master
The default user/pass is admin/admin. And that is perhaps not the most secure combo :)
To change make this change in the container.
docker-compose exec gvm10 /usr/local/sbin/gvmd -v --user=admin --new-password=super-secret-password
Start a browser and point it to the ip or url of your docker host. https://192.168.100.100 to login with your new password.
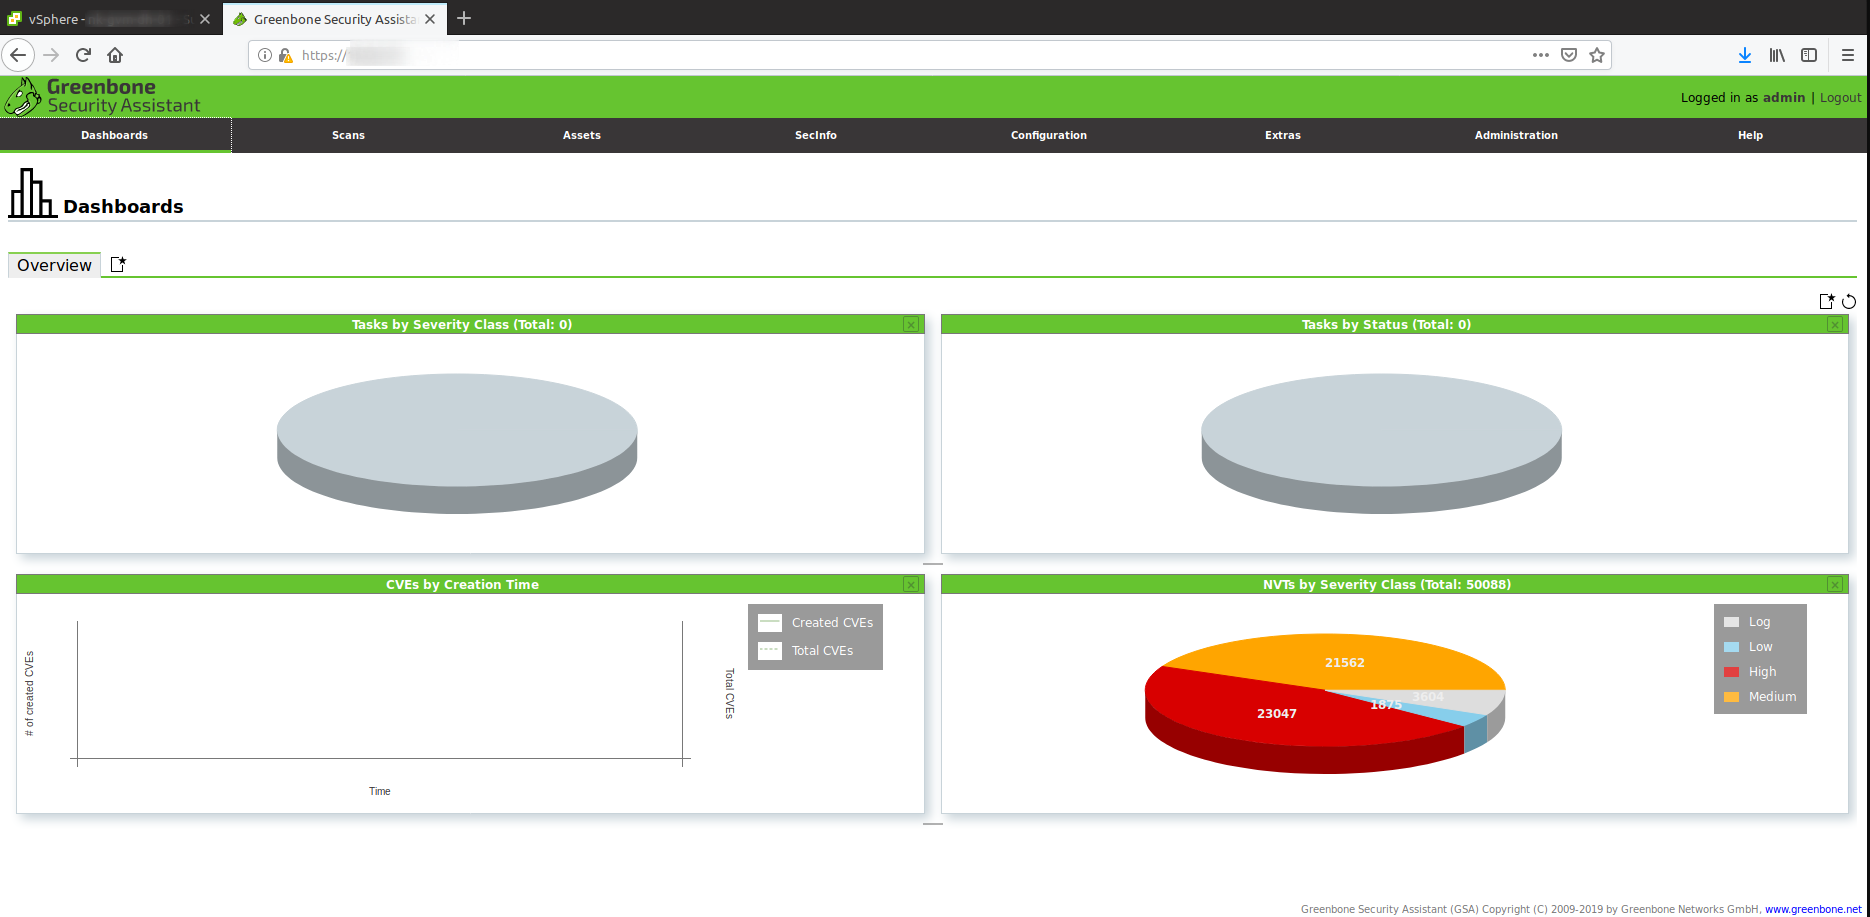
 Then you should be greeted with a nice looking dashboard like this
Create some host based firewall rules - Master
Again, this is optional, but with some local hostbased firewall rules that segment your GVM master from other ip’s is only good hygiene.
And in ubuntu there is UFW that works really good as a local firewall, and it’s pretty easy to manage.
The only thing that you need to have open for this setup is tcp/22 (SSH) and tcp/443 (GSAD) from your management workstations
Housekeeping on master
Every know and then you should update the different databases and NVT’s.
Sync SCAP and CERT data with
docker-compose exec gvm10 /usr/local/sbin/greenbone-scapdata-sync
docker-compose exec gvm10 /usr/local/sbin/greenbone-certdata-sync
Sync NVT data
docker-compose exec gvm10 /usr/local/sbin/greenbone-nvt-sync
To be continued…
SLAVE
This is a slimmed down image with no GSA that is used only for slaves (scanners)
Install Docker and docker-compose on the Slave(s)
sudo apt-get remove docker docker-engine docker.io containerd runc
sudo apt-get update

sudo apt-get install \
    apt-transport-https \
    ca-certificates \
    curl \
    gnupg-agent \
    software-properties-common

curl -fsSL https://download.docker.com/linux/ubuntu/gpg | sudo apt-key add -

sudo add-apt-repository \
   "deb [arch=amd64] https://download.docker.com/linux/ubuntu \
   $(lsb_release -cs) \
   stable"

sudo apt-get install docker-ce docker-ce-cli containerd.io
sudo curl -L "https://github.com/docker/compose/releases/download/1.24.0/docker-compose-$(uname -s)-$(uname -m)" -o /usr/local/bin/docker-compose

sudo chmod +x /usr/local/bin/docker-compose
Add users and download docker - Slave(s)
sudo adduser --disabled-login gvm-docker
sudo usermod -aG docker gvm-docker
Then change to the newly created user and download docker-compose.yml for the master.
sudo su - gvm-docker
curl -O https://raw.githubusercontent.com/falkowich/gvm10-docker/master/slave/docker-compose.yml
That file looks something like this:
version: '3'
services:

  gvm10:
    image: falkowich/gvm10:slave
    ports:
      - 9391:9391
    restart: always
    volumes:
      - gvm:/usr/local/var/lib/gvm/

volumes:
  gvm:
TODO: Explain the yml somewhat
Start GVM10 - Slave(s)
First download and start the container and tail the log for debugging purpose.
 docker-compose up -d
 docker-compose logs -f

After this the container starts up and loads NVT’s
When the screen shows Updating NVT cache it’s ok to continue…

Change passwords and add a sync user to gvmd - Slave(s)
The default user/pass is admin/admin. And that is perhaps not the most secure combo :)
To change make this change in the container.
docker-compose exec gvm10 /usr/local/sbin/gvmd -v --user=admin --new-password=another-super-secret-password
Then create a new admin user for the master-slave communication.
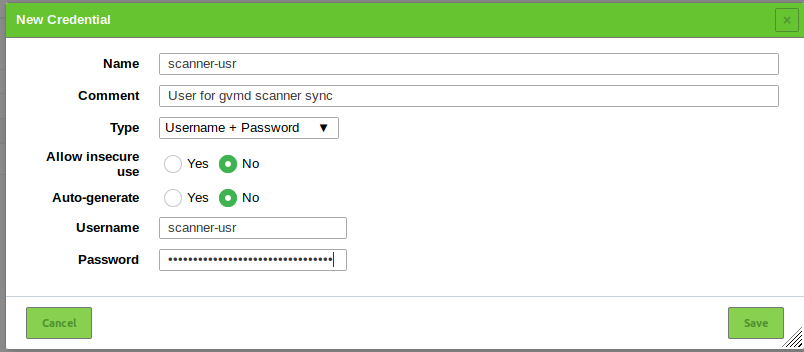
docker-compose exec gvm10 /usr/local/sbin/gvmd -v --create-user=scanner-usr
docker-compose exec gvm10 /usr/local/sbin/gvmd -v --user=scanner-usr --new-password=super-secret-scanner-usr-password
Create a scanner config - Master
Login to GSA on your Master node.
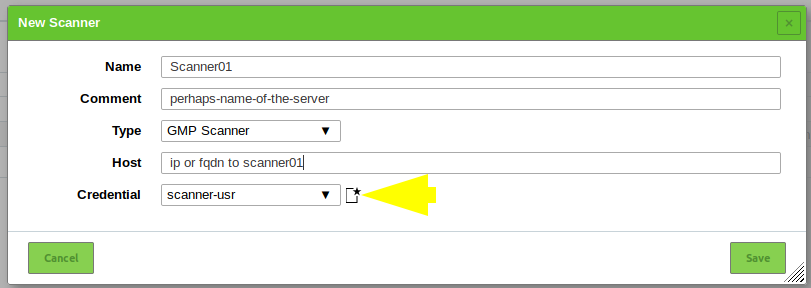
Navigate to Configuration > Scanners > New Scanner.
Fill in the appropriate settings.


Get certificate and add to Scanner - Master/Slave(s)
Start with copying the cacert from your slave to the master, this is my take on that :)
sudo scp /var/lib/docker/volumes/gvm-docker_gvm/_data/CA/cacert.pem user@ip.or.fqdn.to.master:/tmp/scanner01-cacert.pem
On the Master, move the cert to the container.
sudo mv /tmp/scanner01-cacert.pem /var/lib/docker/volumes/gvm-docker_gvm/_data/CA/
Get the id of scanner01.
docker-compose exec gvm10 /usr/local/sbin/gvmd -v --get-scanners

08b69003-5fc2-4037-a432-93b440211c73  OpenVAS Default
6acd0832-df90-11e4-b9d5-24as4461215b  CVE
33d23dc3-00f1-4e4a-82da-1f003303c322  Scanner01  «««« This is the ID we are looking for.
Bind the scanners cert to the scanner.
docker-compose exec gvm10 /usr/local/sbin/gvmd -v --modify-scanner=33d23dc3-00f1-4e4a-82da-1f003303c322 --scanner-ca-pub=/usr/local/var/lib/gvm/CA/scanner01-cacert.pem
After this the scanner should be connected to the Master.
Then remember to remove the cert, if you do not remove it the service will have trouble start next time after a restart.
sudo rm /var/lib/docker/volumes/gvm-docker_gvm/_data/CA/scanner01-cacert.pem
Test out the scanner - Master
In GSA on the master create a new task and set the Scanner to your newly created scanner01.
Epilogue :)
Hopefully this will make more ppl try out GVM.
If you have any questions about this guide or the docker images used, just comment below or make an issue on the github repo.
Now it’s time for a well earned cup of Strong Coffee