Install Greenbone Vulnerability Manager 11 on Debian 10.2 from source...
Aug 5, 2020BIG THANKS
First of all, this guide could not be possible without the help of all nice people in the comments and in the slackchannel
Edits:
- 2019-12-21 - Missed a semiconon at profiles, not wixed.. PEBKAC again
- 2019-12-22 - Updated writeup with the latest gvm11 gse - release branches as @BjoernRicks suggested.
- 2019-12-22 -
Cherry picked PR#802 to update IANA service names - 2019-12-29 - Added a few hygienic apt commands at the beginning, thanks to Tonny in our slack channel.
- 2020-03-29 - A problem with ospd-openvas was found by karkaa, and that is now fixed in this guide. The fix with the Default scanner that was suggested by cache-memory is now implemented too.
- 2020-08-05 - Fixes to sanify the systemd services as suggested by cfi-gb and with the help of the sourcesfiles from Debian Security Tools Packaging Team. Tried out with latest gvm11 git as of this date
Caveats:
- I am no experienced debian user, so this may contain errors. Pls do not hesitate to tell me in comments or slack.
Could not make OSPD-Openvas default scanner. Any Ideas?This is now fixed with the help of cache-memory- Not so much testing made yet, If you test it out and you find something. Leave a message in the comments :)

As of this build I am trying to keep to greenbones main distro when developing GVM/GSE.
In the README’s there are numerous references to debian packageing, so this build will be on a debian 10.2 dist.
Like the last guides:
This installation is not made for public facing servers, there is no built in security in this setup.
I take no responsibility if this guide bork you server, burn your house down to ashes, make your christmas tree self combust or makes your cat to leave you..
It’s under the “it worked for me[tm]” clause.
This is as always a work in progress.

Preparation is key
Prepare a can of coffee and (if at home) put on your best comfy clothes.
When writhing this, Leo Moracchioli’s playlist was playing in the headphones..
Fire up an vanilla Debian 10.2 on a vm for some testing and start the installation.
I picked the netinst cd
Install nothing but ssh-server and “standard system utilities”, no root password (disabled root, like ubuntu server installation)
fixing locales
I have some trouble with my locales sv_SE.UTF-8, so I have to run this to get everything running as planned.
From https://www.thomas-krenn.com/en/wiki/Perl_warning_Setting_locale_failed_in_Debian
sudo locale-gen en_US.UTF-8 ;\
export LC_ALL="C"
install requirements
sudo apt update ;\
sudo apt -y dist-upgrade ;\
sudo apt -y autoremove ;\
sudo apt install -y software-properties-common ;\
sudo apt install -y cmake pkg-config libglib2.0-dev libgpgme-dev libgnutls28-dev uuid-dev libssh-gcrypt-dev \
libldap2-dev doxygen graphviz libradcli-dev libhiredis-dev libpcap-dev bison libksba-dev libsnmp-dev \
gcc-mingw-w64 heimdal-dev libpopt-dev xmltoman redis-server xsltproc libical-dev postgresql \
postgresql-contrib postgresql-server-dev-all gnutls-bin nmap rpm nsis curl wget fakeroot gnupg \
sshpass socat snmp smbclient libmicrohttpd-dev libxml2-dev python-polib gettext rsync xml-twig-tools \
python3-paramiko python3-lxml python3-defusedxml python3-pip python3-psutil virtualenv vim git ;\
sudo apt install -y texlive-latex-extra --no-install-recommends ;\
sudo apt install -y texlive-fonts-recommended ;\
curl -sS https://dl.yarnpkg.com/debian/pubkey.gpg | sudo apt-key add - ;\
echo "deb https://dl.yarnpkg.com/debian/ stable main" | sudo tee /etc/apt/sources.list.d/yarn.list ;\
sudo apt update ;\
sudo apt -y install yarn
create user
echo 'export PATH="$PATH:/opt/gvm/bin:/opt/gvm/sbin:/opt/gvm/.local/bin"' | sudo tee -a /etc/profile.d/gvm.sh ;\
sudo chmod 0755 /etc/profile.d/gvm.sh ;\
source /etc/profile.d/gvm.sh ;\
sudo bash -c 'cat << EOF > /etc/ld.so.conf.d/gvm.conf
# gmv libs location
/opt/gvm/lib
EOF'
sudo mkdir /opt/gvm ;\
sudo adduser gvm --disabled-password --home /opt/gvm/ --no-create-home --gecos '' ;\
sudo usermod -aG redis gvm  # This is for ospd-openvas can connect to redis.sock.. If you have a better idea here, pls write in the comments :) ;\
sudo chown gvm:gvm /opt/gvm/ ;\
sudo su - gvm
mkdir src ;\
cd src ;\
export PKG_CONFIG_PATH=/opt/gvm/lib/pkgconfig:$PKG_CONFIG_PATH
Download stuff
git clone -b gvm-libs-11.0 --single-branch  https://github.com/greenbone/gvm-libs.git ;\
git clone -b openvas-7.0 --single-branch https://github.com/greenbone/openvas.git ;\
git clone -b gvmd-9.0 --single-branch https://github.com/greenbone/gvmd.git ;\
git clone -b master --single-branch https://github.com/greenbone/openvas-smb.git ;\
git clone -b gsa-9.0 --single-branch https://github.com/greenbone/gsa.git ;\
git clone -b ospd-openvas-1.0 --single-branch  https://github.com/greenbone/ospd-openvas.git ;\
git clone -b ospd-2.0 --single-branch https://github.com/greenbone/ospd.git
install gvm-libs
cd gvm-libs ;\
 export PKG_CONFIG_PATH=/opt/gvm/lib/pkgconfig:$PKG_CONFIG_PATH ;\
 mkdir build ;\
 cd build ;\
 cmake -DCMAKE_INSTALL_PREFIX=/opt/gvm .. ;\
 make ;\
 make doc ;\
 make install ;\
 cd /opt/gvm/src
config and build openvas-smb
cd openvas-smb ;\
 export PKG_CONFIG_PATH=/opt/gvm/lib/pkgconfig:$PKG_CONFIG_PATH ;\
 mkdir build ;\
 cd build/ ;\
 cmake -DCMAKE_INSTALL_PREFIX=/opt/gvm .. ;\
 make ;\
 make install ;\
 cd /opt/gvm/src
config and build scanner
cd openvas ;\
 export PKG_CONFIG_PATH=/opt/gvm/lib/pkgconfig:$PKG_CONFIG_PATH ;\
 mkdir build ;\
 cd build/ ;\
 cmake -DCMAKE_INSTALL_PREFIX=/opt/gvm .. ;\
 make ;\
 make doc ;\
 make install ;\
 cd /opt/gvm/src
Fix redis for default openvas install
Here be dragons
Remember to become root
For this become almight root. Preferably log in to another ssh session as your normal user with sudo rights.
sudo su
export LC_ALL="C" ;\
ldconfig ;\
cp /etc/redis/redis.conf /etc/redis/redis.orig ;\
cp /opt/gvm/src/openvas/config/redis-openvas.conf /etc/redis/ ;\
chown redis:redis /etc/redis/redis-openvas.conf ;\
echo "db_address = /run/redis-openvas/redis.sock" > /opt/gvm/etc/openvas/openvas.conf ;\
systemctl enable redis-server@openvas.service ;\
systemctl start redis-server@openvas.service
sysctl -w net.core.somaxconn=1024
sysctl vm.overcommit_memory=1

echo "net.core.somaxconn=1024"  >> /etc/sysctl.conf
echo "vm.overcommit_memory=1" >> /etc/sysctl.conf
cat << EOF > /etc/systemd/system/disable-thp.service
[Unit]
Description=Disable Transparent Huge Pages (THP)

[Service]
Type=simple
ExecStart=/bin/sh -c "echo 'never' > /sys/kernel/mm/transparent_hugepage/enabled && echo 'never' > /sys/kernel/mm/transparent_hugepage/defrag"

[Install]
WantedBy=multi-user.target
EOF
systemctl daemon-reload ;\
systemctl start disable-thp ;\
systemctl enable disable-thp ;\
systemctl restart redis-server
As openvas will be launched from an ospd-openvas process with sudo, the next configuration is required in the sudoers file:
visudo
Edit the secure_path line to this.
Defaults secure_path="/usr/local/sbin:/usr/local/bin:/usr/sbin:/usr/bin:/sbin:/bin:/snap/bin:/opt/gvm/sbin"
Add this line to allow the created gvm user to launch openvas with root permissions.
### Allow the user running ospd-openvas, to launch openvas with root permissions
gvm ALL = NOPASSWD: /opt/gvm/sbin/openvas
gvm ALL = NOPASSWD: /opt/gvm/sbin/gsad
Then exit from the root shell, and go back to to the gvm user
Here be dragons
Remember to change from root to gvm user
update nvt
greenbone-nvt-sync
Here be dragons
If you get an error here, run greenbone-nvt-sync multiple times.
upload plugins in redis with openvas
sudo openvas -u
Tip
This is going to take some time depending on your hardware.
You can watch openvas and redis-server processes using alot of cpu when this is running.
  PID USER      PR  NI    VIRT    RES    SHR S  %CPU  %MEM     TIME+ COMMAND
27796 root      20   0  105356  26436   3720 R  80.0   0.7   0:17.00 openvas
27605 redis     20   0  144856  86600   3200 S  21.7   2.1   0:06.23 redis-server
config and build manager
cd gvmd ;\
 export PKG_CONFIG_PATH=/opt/gvm/lib/pkgconfig:$PKG_CONFIG_PATH ;\
 sed -i 's/POSTGRES=0/POSTGRES=1/g' tools/gvm-portnames-update.in ;\
 mkdir build ;\
 cd build/ ;\
 cmake -DCMAKE_INSTALL_PREFIX=/opt/gvm .. ;\
 make ;\
 make doc ;\
 make install ;\
 cd /opt/gvm/src
Configure PostgreSQL
For this we will use the sudo enabled user. (not root)
Then setup permissions
sudo -u postgres bash
export LC_ALL="C"
createuser -DRS gvm
createdb -O gvm gvmd

psql gvmd
create role dba with superuser noinherit;
grant dba to gvm;
create extension "uuid-ossp";
exit
exit
Exit the sudo user shell.
fix certs
Here be dragons
Remember to change from sudo user to gvm user
gvm-manage-certs -a
create admin user
gvmd --create-user=admin --password=admin
update feeds
greenbone-certdata-sync
Here be dragons
This script breaks alot for me lately, so you can be forced to run greenbone-scapdata-syn multiple times.
update IANA Service names
mkdir iana_service_ports ;\
cd iana_service_ports ;\
wget https://www.iana.org/assignments/service-names-port-numbers/service-names-port-numbers.xml ;\
gvm-portnames-update service-names-port-numbers.xml
cd /opt/gvm/src
configure and install gsa
cd gsa ;\
 export PKG_CONFIG_PATH=/opt/gvm/lib/pkgconfig:$PKG_CONFIG_PATH ;\
 mkdir build ;\
 cd build/ ;\
 cmake -DCMAKE_INSTALL_PREFIX=/opt/gvm .. ;\
 make ;\
 make doc ;\
 make install ;\
 touch /opt/gvm/var/log/gvm/gsad.log ;\
 cd /opt/gvm/src
OSPD-OPENVAS
install the virtualenv
cd /opt/gvm/src ;\
export PKG_CONFIG_PATH=/opt/gvm/lib/pkgconfig:$PKG_CONFIG_PATH ;\
virtualenv --python python3.7  /opt/gvm/bin/ospd-scanner/ ;\
source /opt/gvm/bin/ospd-scanner/bin/activate
install ospd
mkdir /opt/gvm/var/run/ospd/ ;\
cd ospd ;\
pip3 install . ;\
cd /opt/gvm/src
install ospd-openvas
cd ospd-openvas ;\
pip3 install . ;\
cd /opt/gvm/src
create startupscripts
As root run these
Here be dragons
Remember to become root
cat << EOF > /etc/systemd/system/gvmd.service
[Unit]
Description=Open Vulnerability Assessment System Manager Daemon
Documentation=man:gvmd(8) https://www.greenbone.net
Wants=postgresql.service ospd-openvas.service
After=postgresql.service ospd-openvas.service

[Service]
Type=forking
User=gvm
Group=gvm
PIDFile=/opt/gvm/var/run/gvmd.pid
WorkingDirectory=/opt/gvm
ExecStart=/opt/gvm/sbin/gvmd --osp-vt-update=/opt/gvm/var/run/ospd.sock
ExecReload=/bin/kill -HUP $MAINPID
KillMode=mixed
Restart=on-failure
RestartSec=2min
KillMode=process
KillSignal=SIGINT
GuessMainPID=no
PrivateTmp=true

[Install]
WantedBy=multi-user.target
EOF
cat << EOF > /etc/systemd/system/gsad.service
[Unit]
Description=Greenbone Security Assistant (gsad)
Documentation=man:gsad(8) https://www.greenbone.net
After=network.target
Wants=gvmd.service


[Service]
Type=forking
PIDFile=/opt/gvm/var/run/gsad.pid
WorkingDirectory=/opt/gvm
ExecStart=/opt/gvm/sbin/gsad --drop-privileges=gvm
Restart=on-failure
RestartSec=2min
KillMode=process
KillSignal=SIGINT
GuessMainPID=no
PrivateTmp=true

[Install]
WantedBy=multi-user.target
EOF
cat << EOF > /etc/systemd/system/ospd-openvas.service
[Unit]
Description=Job that runs the ospd-openvas daemon
Documentation=man:gvm
After=network.target redis-server@openvas.service
Wants=redis-server@openvas.service

[Service]
Environment=PATH=/opt/gvm/bin/ospd-scanner/bin:/opt/gvm/bin:/opt/gvm/sbin:/opt/gvm/.local/bin:/usr/local/sbin:/usr/local/bin:/usr/sbin:/usr/bin:/sbin:/bin
Type=forking
User=gvm
Group=gvm
WorkingDirectory=/opt/gvm
PIDFile=/opt/gvm/var/run/ospd-openvas.pid
ExecStart=/opt/gvm/bin/ospd-scanner/bin/python /opt/gvm/bin/ospd-scanner/bin/ospd-openvas --pid-file /opt/gvm/var/run/ospd-openvas.pid --unix-socket=/opt/gvm/var/run/ospd.sock --log-file /opt/gvm/var/log/gvm/ospd-scanner.log --lock-file-dir /opt/gvm/var/run/ospd/
Restart=on-failure
RestartSec=2min
KillMode=process
KillSignal=SIGINT
GuessMainPID=no
PrivateTmp=true

[Install]
WantedBy=multi-user.target
EOF
systemctl daemon-reload ;\
systemctl enable gvmd ;\
systemctl enable gsad ;\
systemctl enable ospd-openvas ;\
systemctl start gvmd ;\
systemctl start gsad ;\
systemctl start ospd-openvas
Check that the services are up and running
systemctl status gvmd
systemctl status gsad
systemctl status ospd-openvas
Exit your root session
Modify your Default scanner
As user gvm, get Default scanner UUID
Here be dragons
Remember to change from root to gvm user
(ospd-scanner) gvm@localhost:/opt/gvm/src$ gvmd --get-scanners
08b69003-5fc2-4037-a479-93b440211c73  OpenVAS  /tmp/ospd.sock  0  OpenVAS Default «««««««««« THIS UUID
6acd0832-df90-11e4-b9d5-28d24461215b  CVE    0  CVE
Then modify the scanner
(ospd-scanner) gvm@localhost:/opt/gvm/src$ gvmd --modify-scanner=08b69003-5fc2-4037-a479-93b440211c73 --scanner-host=/opt/gvm/var/run/ospd.sock
Scanner modified.
Now you can point your browser to GSA https://ipnumberofyourserver and login
Try out a scan with the wizard.
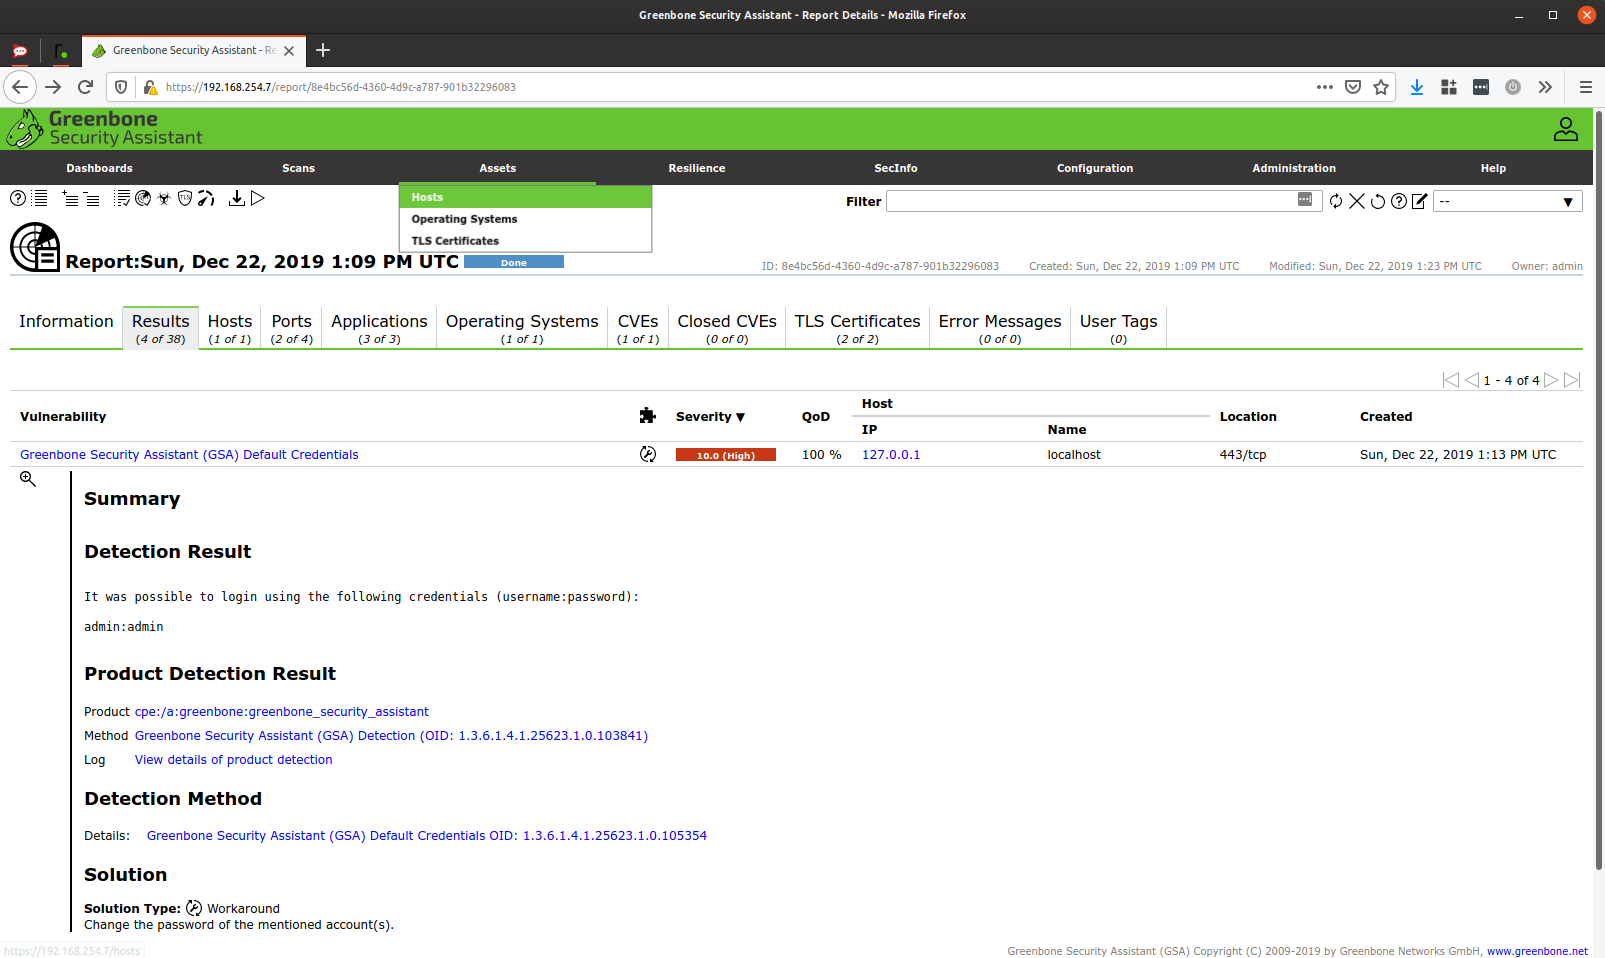
If you scan 127.0.0.1 and have not changed the user/pass you should get:
Tip
If your NVT’s are empty. This can be because the VT database isn’t updated.
To check what gvmd is doing, tail the gvmd-log and see what the latest output is.
root@localhost:/home/falk# tail /opt/gvm/var/log/gvm/gvmd.log -f
md   main:MESSAGE:2020-08-05 12h17.00 utc:28570:    Greenbone Vulnerability Manager version 9.0.1~git-ede916cf-gvmd-9.0 (GIT revision ede916cf-gvmd-9.0) (DB revision 221)
md manage:   INFO:2020-08-05 12h17.00 utc:28570:    Modifying scanner.
md manage:WARNING:2020-08-05 12h17.00 utc:28570: database must be initialised from scanner
util gpgme:MESSAGE:2020-08-05 12h17.00 utc:28570: Setting GnuPG dir to '/opt/gvm/var/lib/gvm/gvmd/gnupg'
util gpgme:MESSAGE:2020-08-05 12h17.00 utc:28570: Using OpenPGP engine version '2.2.12'
md   main:MESSAGE:2020-08-05 12h17.10 utc:28592:    Greenbone Vulnerability Manager version 9.0.1~git-ede916cf-gvmd-9.0 (GIT revision ede916cf-gvmd-9.0) (DB revision 221)
md manage:   INFO:2020-08-05 12h17.10 utc:28592:    Getting scanners.
md manage:WARNING:2020-08-05 12h17.10 utc:28592: database must be initialised from scanner
md manage:   INFO:2020-08-05 12h18.52 utc:28530: Updating VTs in database ... 61142 new VTs, 0 changed VTs
md manage:   INFO:2020-08-05 12h19.03 utc:28530: Updating VTs in database ... done (61142 VTs).
The line you shall see when the db is updated is Updating VTs in database ... done (61142 VTs).
If you have any questions, comment below or join slack and see if someone knows the answer you seek :)
» Slack invite here
And remeber to change the password if you are using this installation somewhere on the network :).
Troubleshooting. And debugging
For lab I ususally use tmux, so I can start the services in the frontend. Tmux cheatsheet in a gist courtesy of henrik » tmux_cheatsheet.markdown
gvmd
As gvm user.
tmux new -s gvmd
gvmd -f --osp-vt-update=/opt/gvm/var/run/ospd.sock
gsad
And then as a sudo user. (perhaps this is fixable with editing the sudoers file later.)
tmux new -s gsad
sudo gsad --drop-privileges=gvm  -f
ospd-openvas
ospd-openvas -f --pid-file /opt/gvm/var/run/ospd-openvas.pid \
             --unix-socket=/opt/gvm/var/run/ospd.sock \
             --log-file /opt/gvm/var/log/gvm/ospd-scanner.log \
             --log-level DEBUG
After some Coffee, it’s time for sleep…